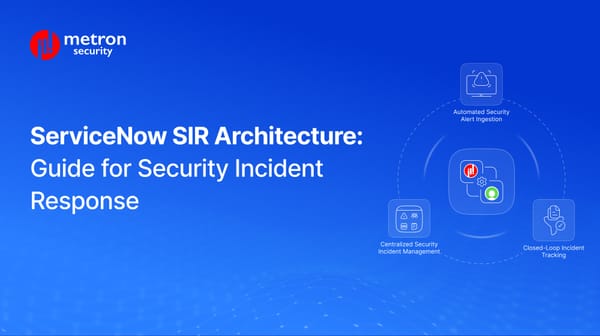
How to Setup ArcSight on EC2 [2023 Walkthrough]
The following article will provide the step-by-step guidelines for setting up Arcsight logger on EC2.
![How to Setup ArcSight on EC2 [2023 Walkthrough]](/content/images/size/w1200/2024/04/How-to-Setup-Up-ArcSight-on-EC2--2023-Walkthrough-.png)
The following article will provide step-by-step guidelines for setting up ArcSight Logger on EC2.
Getting Started
Before doing the actual installation setup, follow these initial steps:
- Follow this link - you'll need it for downloading the *.bin file of the ArcSight Logger.
- Next, you will need to create a login to download the Logger using your relevant credentials.
- Once logged in, one can download the ArcSight Logger.
- Copy the installer to your EC2 instance by using “scp” as shown below in the image:

Setting It Up
Now you should be ready to get to the meat of the matter. Please review the steps below:
1. Launch an Instance
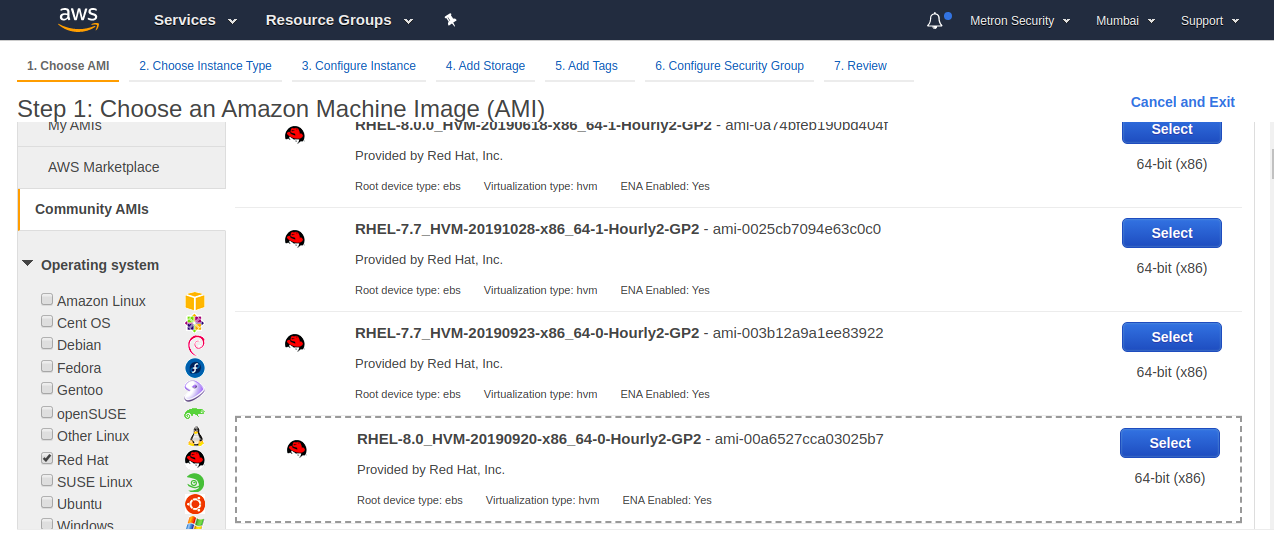
I) Go to community AMI and check Red Hat
II) Select a Red Hat 7.x Image
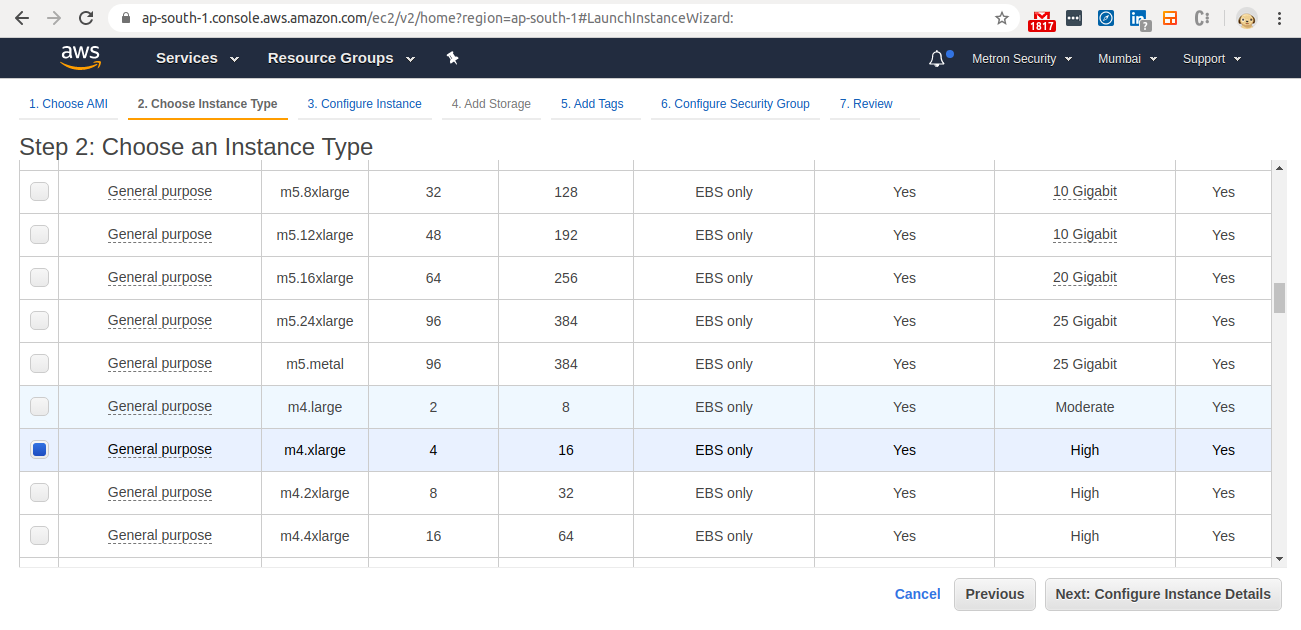
2. Select Instance Type
Select a m4.xlarge Image
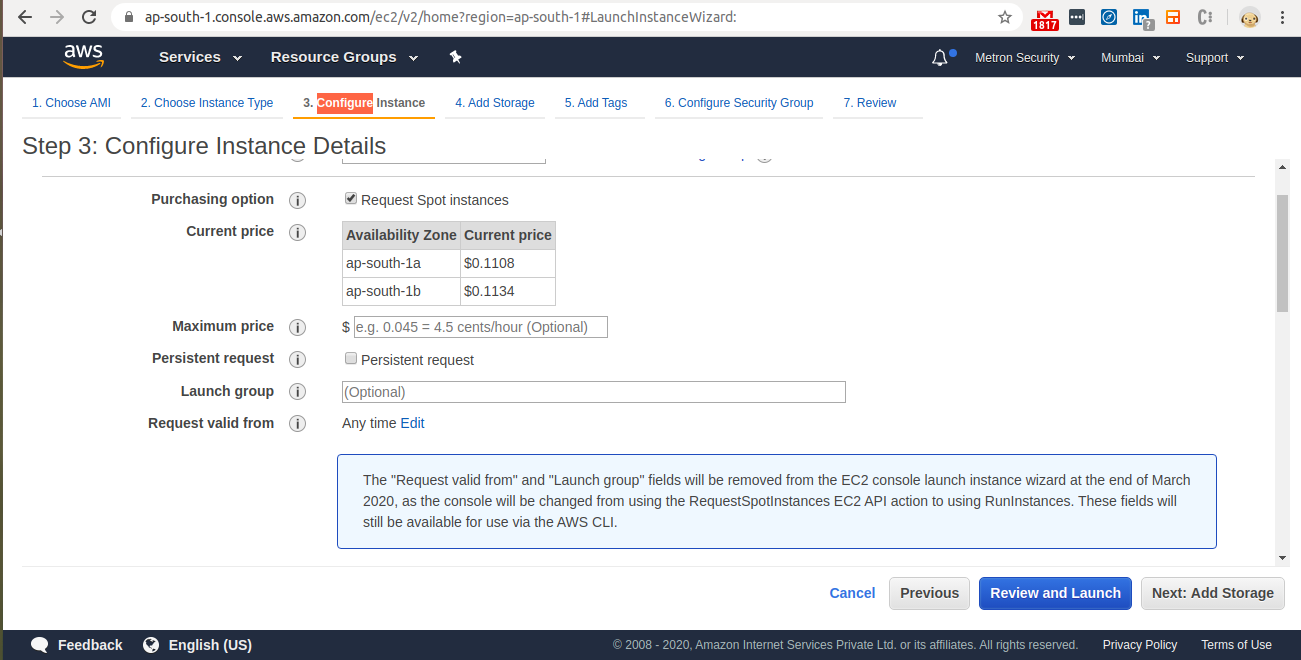
3. Request a Spot
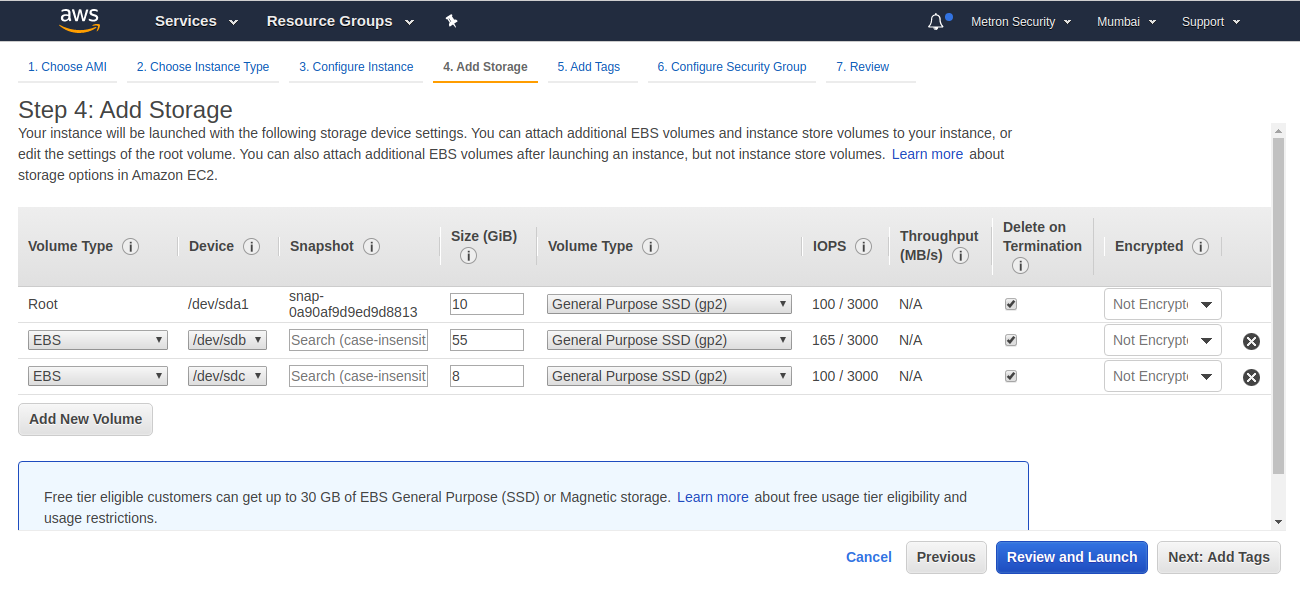
4. Create three volumes
- Create a /dev/sdb volume of 55 GB
- Create a /dev/sdc volume of 8 GB
5. Add tags to your instance

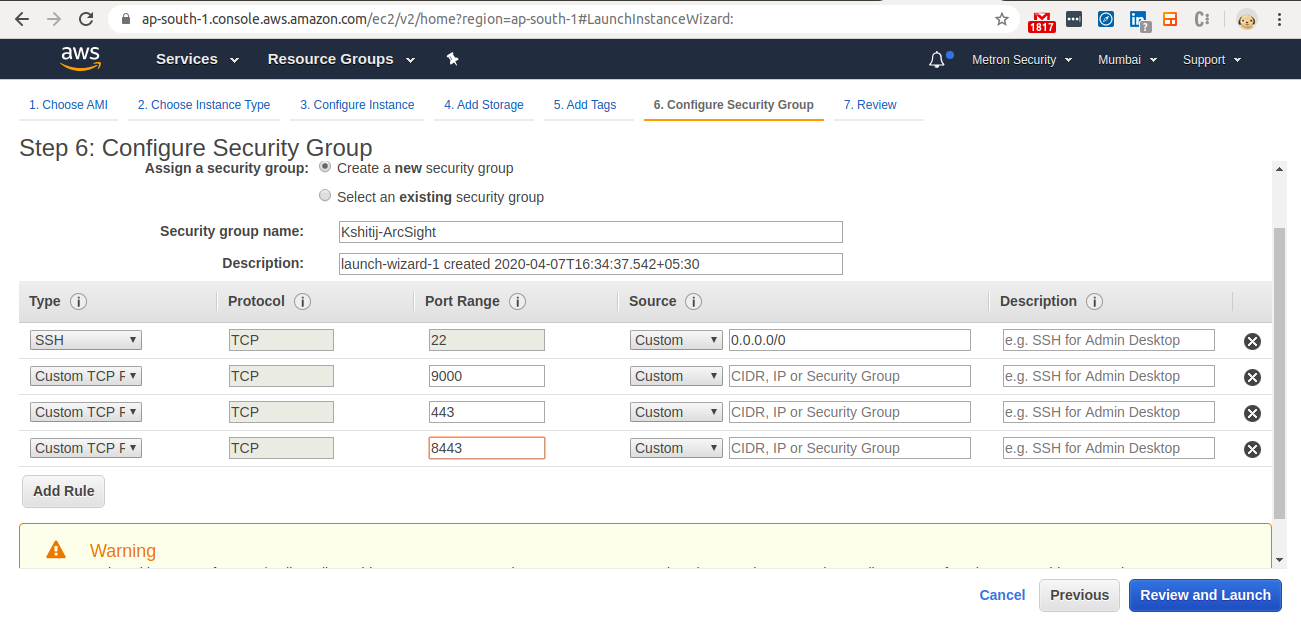
6. Open Ports in your Security Group
- Open port 9000 - as this is the default port when installing ArcSight as a non-root user.
- Open port 443 for https - as this is the default port used when installing as a root user.
- Launch the instance and login.
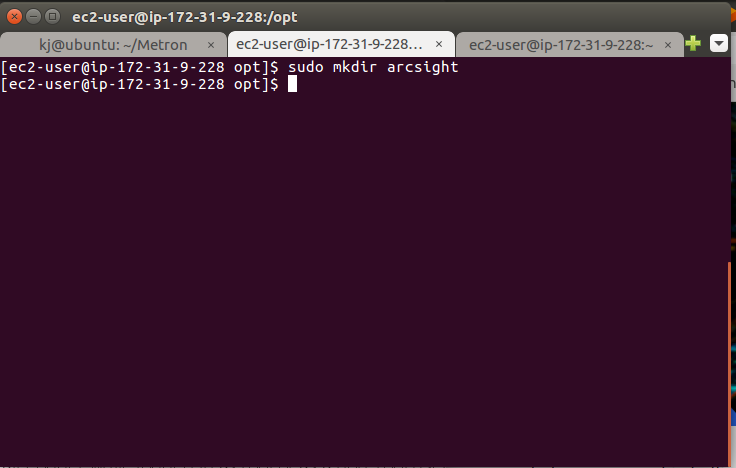
7. Configuring the Instance : Create a directory called ArchSight
Navigate to your /opt directory and create a directory called arcsight.
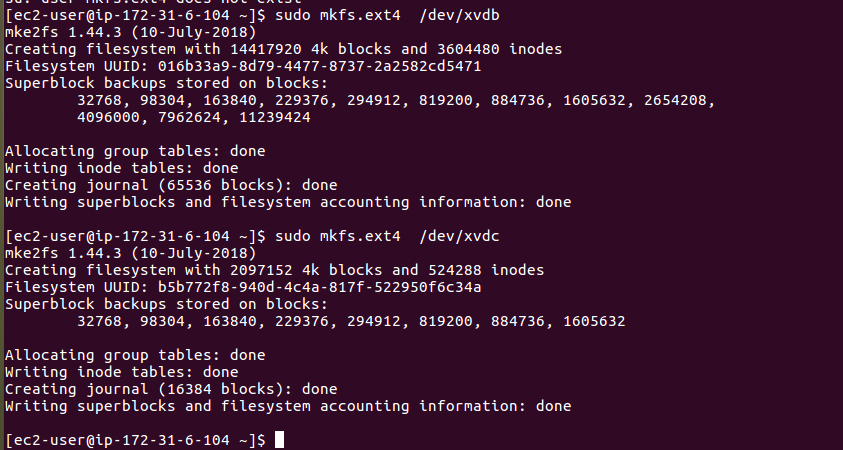
8. Configuring the Instance (I)
Change the format of the volume with commands below:
- sudo mkfs.ext4 /dev/xvdb
- sudo mkfs.ext4 /dev/xvdc
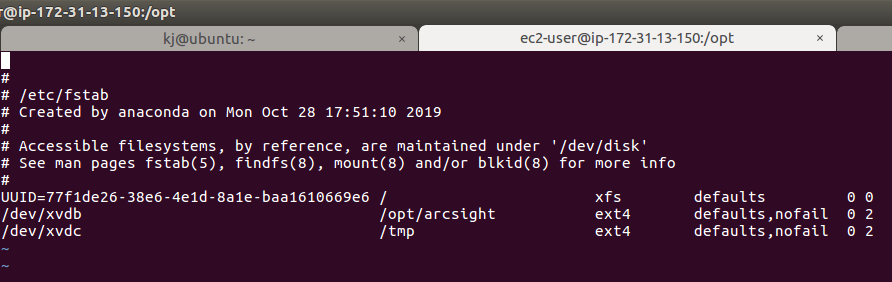
9. Configuring the Instance (II)
Mount and change the etc/fstab
- sudo mount /dev/xvdb /opt/arcsight
- sudo mount /dev/xvdc /tmp
- Navigate to /etc/fstab

And add the below lines:
- /dev/xvdb /opt/arcsight ext4 defaults,nofail 0 2
- /dev/xvdc /tmp ext4 defaults,nofail 0 2
10. Configuring the Instance (III)
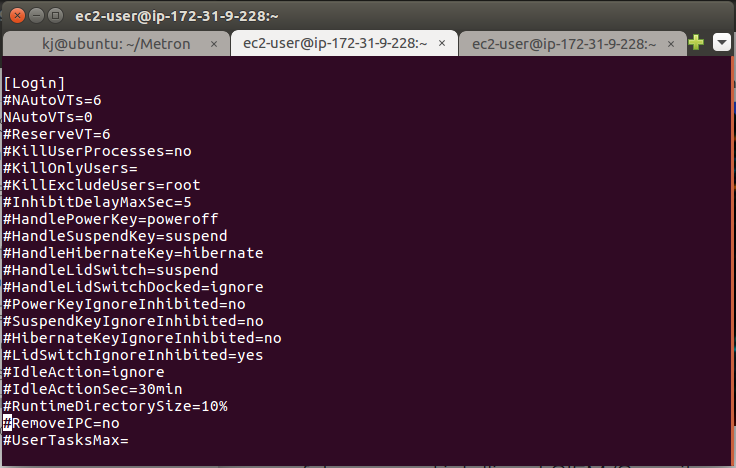
Editing logind.conf
- Navigate to /etc/systemd directory and open the logind.conf (Might need to be a sudo user).
Make sure the file has the following entry:
- RemoveIPC=No
If the entry for “RemoveIPC“ is not there, add it and equate it to “no”.
After making the changes, restart systemd-logind service with the below command:
- systemctl restart systemd-logind.service
11. Configuring the Instance (IV)
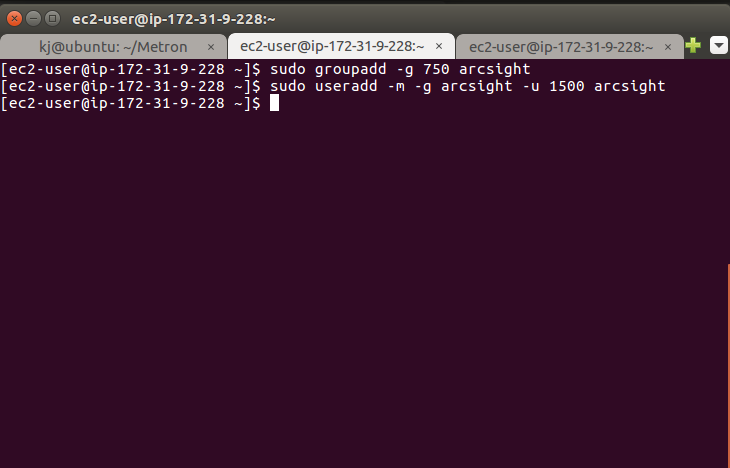
Create a user and a user group
- Login into your EC2 instance
- Run the commands shown in the image to create a user called ‘arcsight' and a usergroup called 'arcsight’
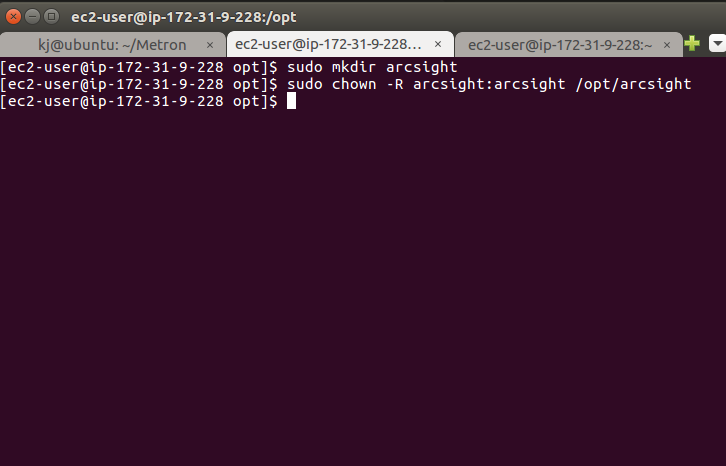
12. Configuring the Instance (V)
Grant permission
- Grant permission for the ArcSight user for /opt/arcsight directory
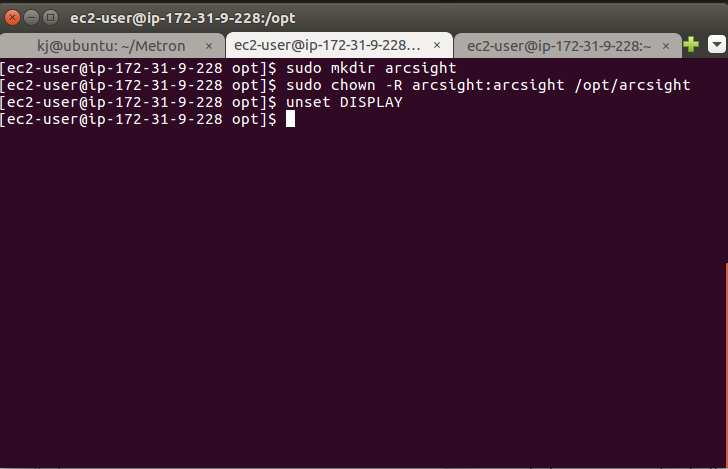
13. Configuring the Instance (VI)
Unset Display
- Since we are installing ArcSight in the console mode:
14. Configuring the Instance (VII)
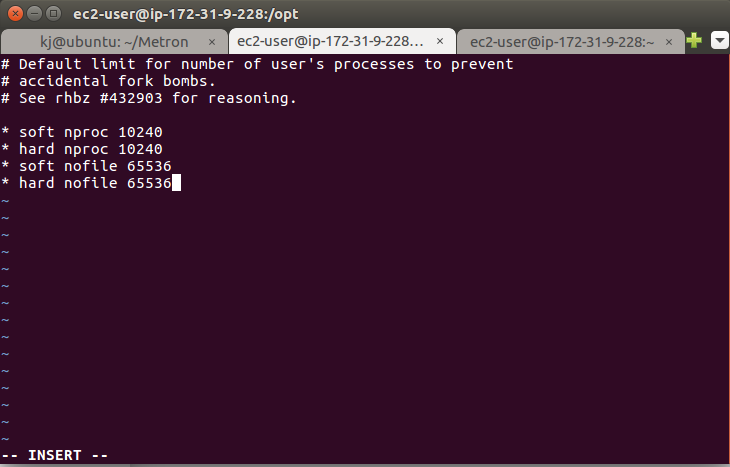
Increasing user process limit and max. no. of process files
- Navigate to the /etc/security/limits.d folder
- Open the 20.nproc.conf file as sudoer in an editor
- Erase the existing records in the file
- Add the records as shown in the image and save the file
- Reboot the instance
And run the command ulimit -a
It should print the output as below:
- open files 65536
- max user processes 10240
15. Configuring the Instance (VIII)
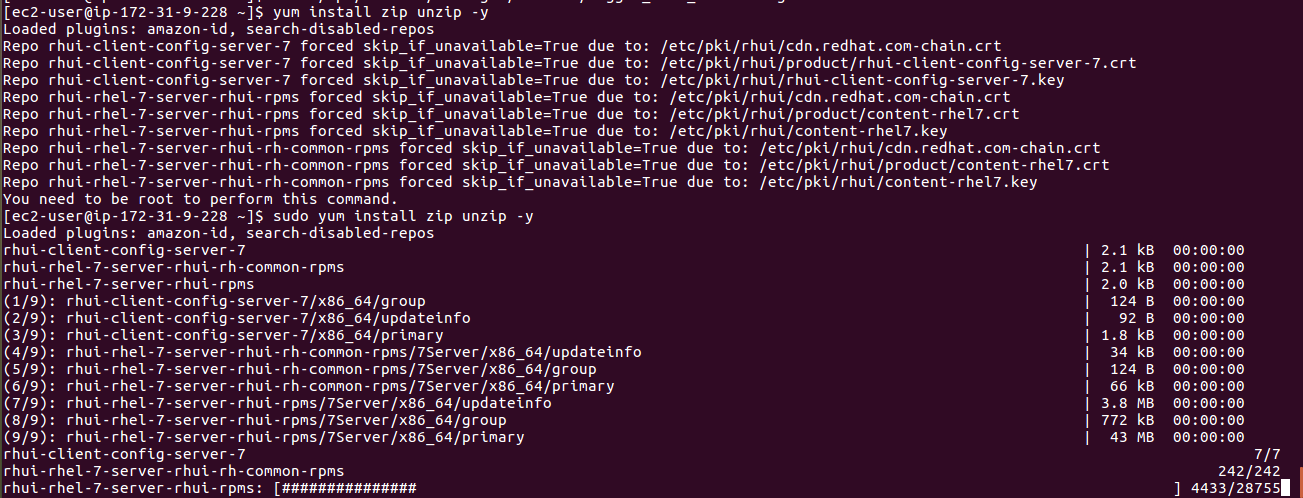
Install zip and give permision to the “/tmp”
Run the commands below:
- chmod 755 /tmp (optional if doing installation as sudoer)
- yum install zip unzip -y
16. Begin installation
- Start the setup in the console mode and make sure you are a sudoer
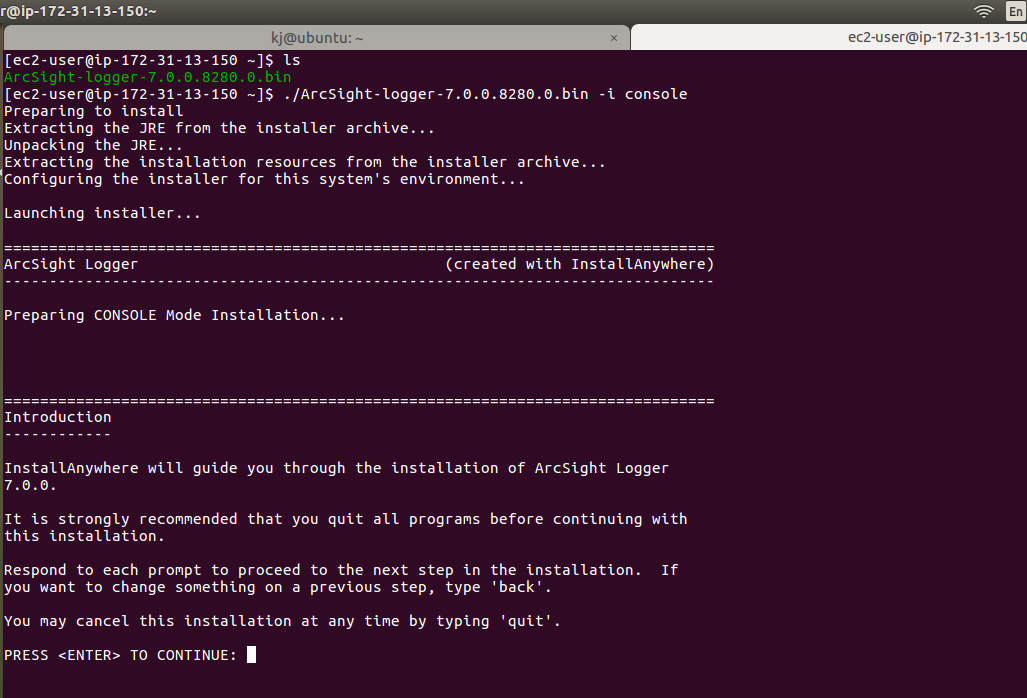
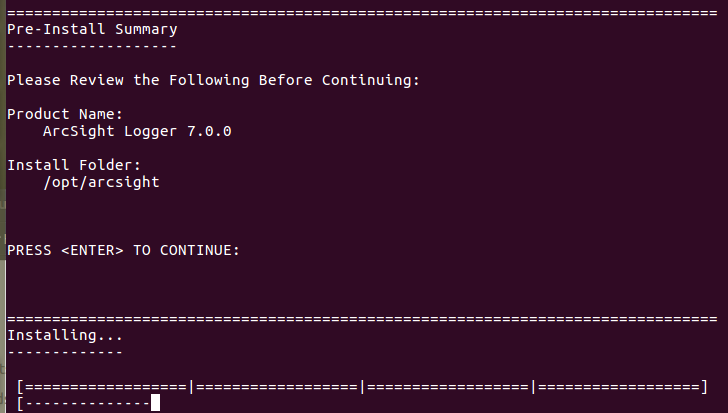
17. Installation Directory
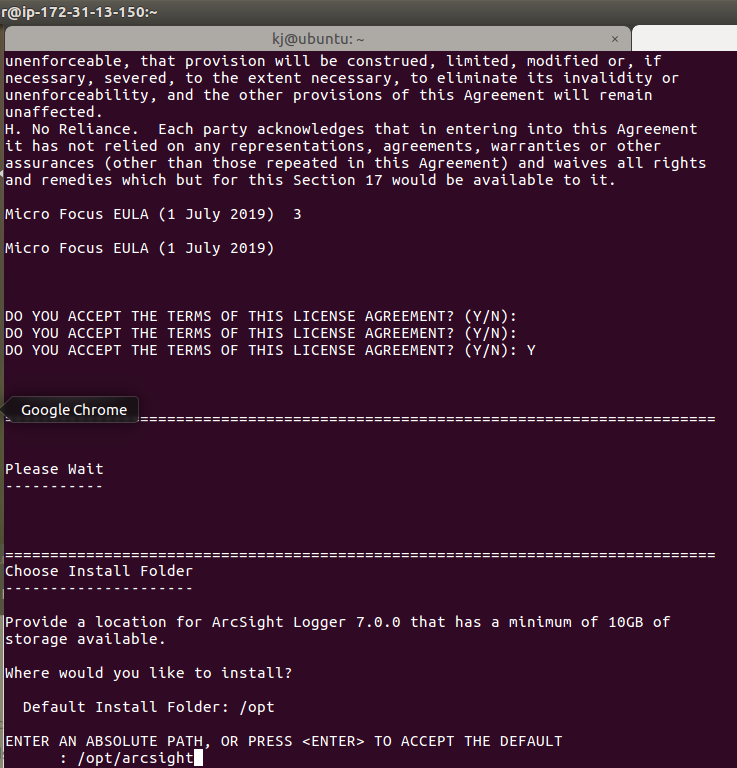
- Accept the license agreement by pressing ENTER
- Specify the installation directory as /opt/arcsight
- Remember, this is the same directory on which you have mounted the /dev/xvdb volume of 55 GB
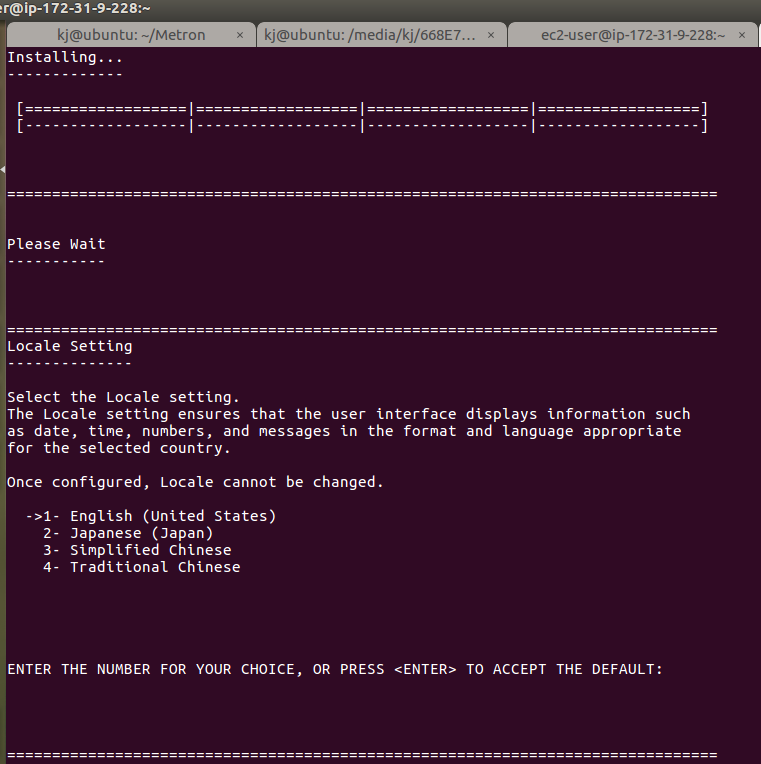
18. Installing...
19. Specify the non root user, port
We need to specify the non root user that we have created "arcsight".
Select ArcSight Logger to run as a service:

20. ArcSight Logger Installation
It asks for a langauge -> press enter to select Default.
21. Begin the configuration
Press enter to start the configuration.
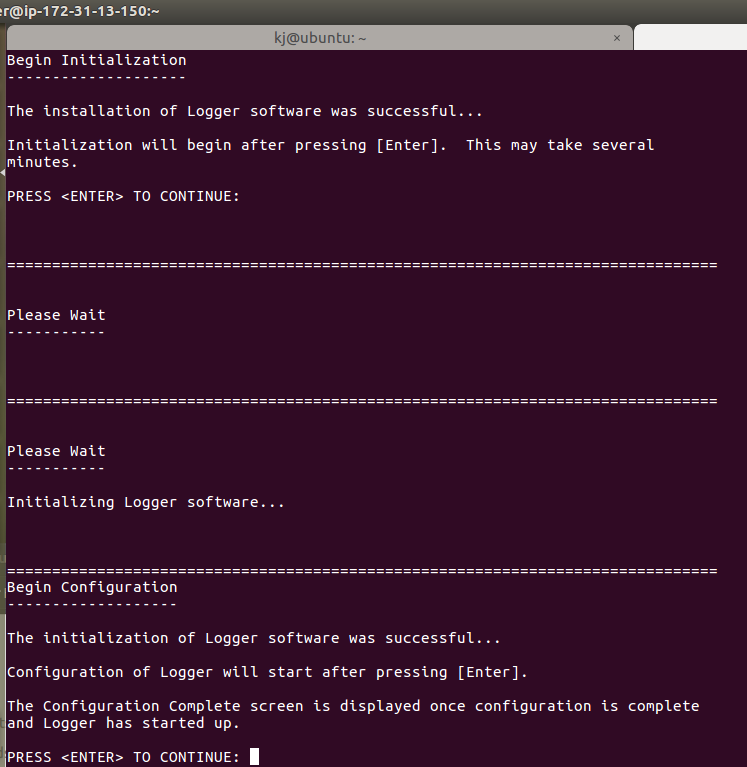
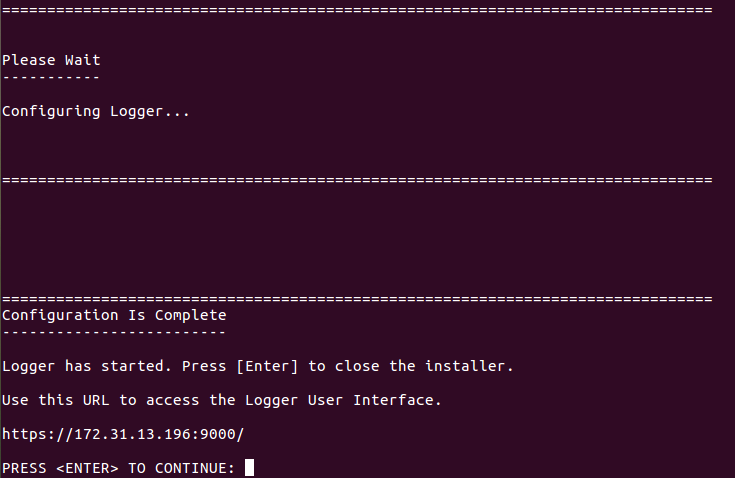
22. Configuration Almost Complete!
Once the configuration is complete, a URL is given to start ArcSight:
NOTE : The url has a private IP of the ec2 machine launched, instead of that, use the public IP.
Press Enter to complete the setup:
23. Check if logger is installed and running
Once completed:
- Navigate to the directory where ArcSight is installed.
- Run the command as shown in the figure.
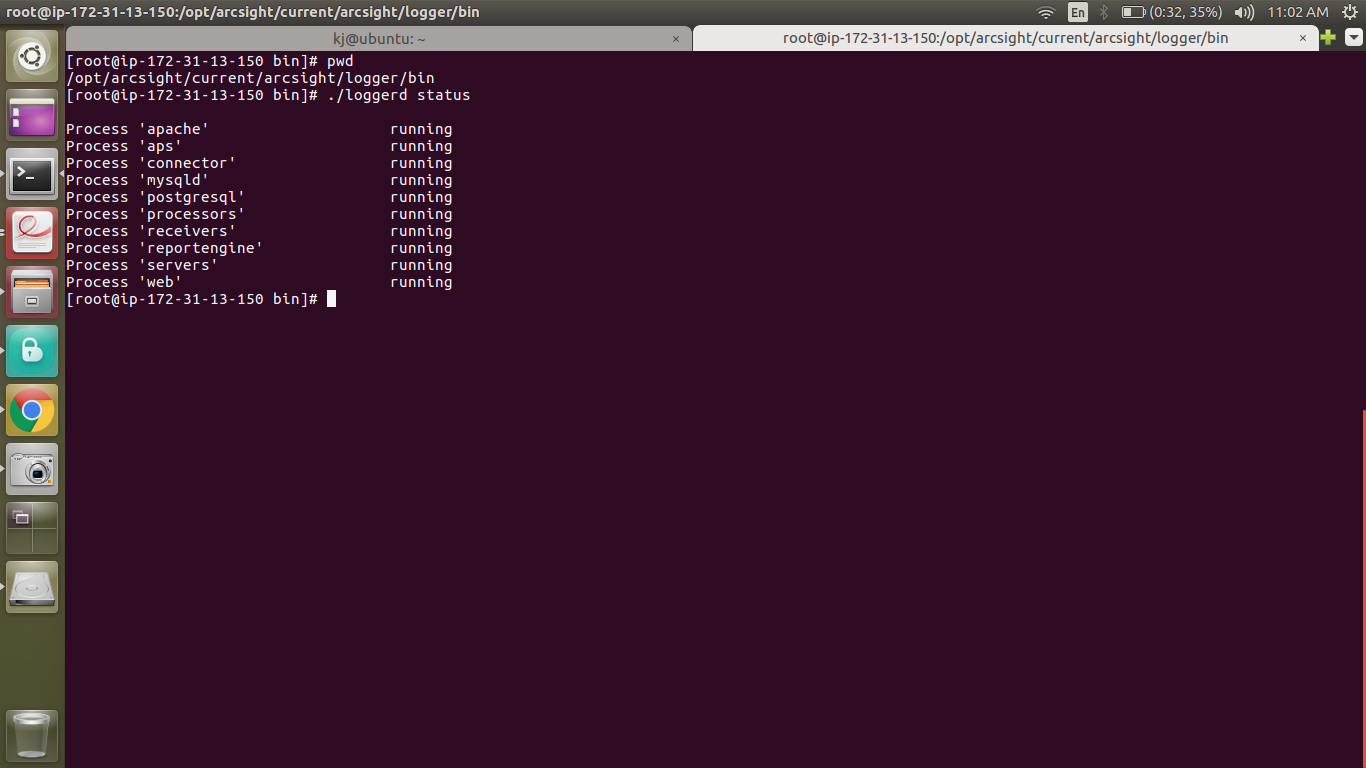
Done!
Metron Security provides on-demand and effective approaches to managing third-party integrations for security ecosystems. Since 2014, Metron has delivered automation solutions for over 200 security applications along with several hundred custom automation solutions.
For more information - www.metronlabs.com
If you are considering any custom cybersecurity solution that focuses on the resources and needs of your organization, please send a note to connect@metronlabs.com.